A checklist is a type of sheet that is used to ensure completeness and consistency when carrying out a task. A checklist, also known as a verification list, is designed in a format that allows the user to verify a list of requirements and to perform repetitive activities on it. The advantage of using checklists is that it enables you to systematize the repetitive activities and controls that we have to do, and later it can be used as a register of the tasks that we have done each day. The checklist is designed in a way that the user can add or edit his or her information on it.
A checklist prepared using Google docs helps to save time and reduce paperwork where repetitive activities are involved. Therefore, it is an important tool for reducing human error and controlling the quality of the output. However, a new Google docs user may find it to be a hard task to create a checklist for the procedure involved.
Steps or procedures involved in the making of a checklist using Google Docs software are clearly explained below.
Step 1
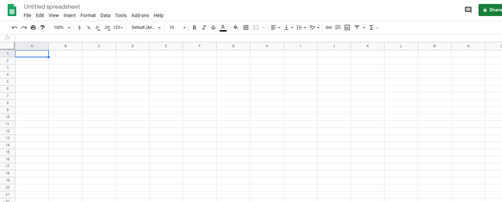
The initial step of creating a checklist using Google docs involves opening the spreadsheet software using any relevant web browser. After searching for the Google docs, then click the rainbow plus sign to create a new document. After clicking the plus sign, a new page opens, which contains blanks cells and tabs on the uppermost part of the page. These tabs contain important settings that are used in the checklist-making process.
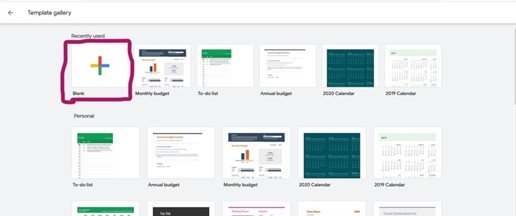
Below is a sample image after clicking the large rainbow plus sign to create a new document.
Step 2
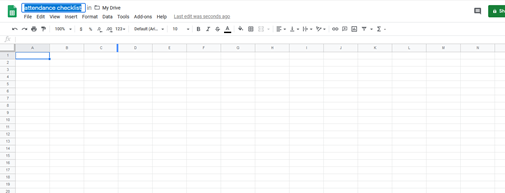
After the page has successfully opened, you can now rename your sheet by giving it the name of your checklist. Click on the left-top side of the page named “Untitled document.” Highlight the two words and delete them. Then you can rename the sheet by giving it the name of the checklist you are creating.

Below is an example of a sheet title in the case where one is preparing a student class attendance checklist.
Step 3
After renaming your work, the next procedure involves inputting data on the empty cells. The format of inputting data on the empty sheet will largely depend on the type of checklist the user wants to create or the type of task involved. The location/ side of the checkboxes may differ from one checklist to another, depending on the use or the type of the list. Before creating the checklist, the one making it should know the number of columns and rows needed to insert the checkbox.
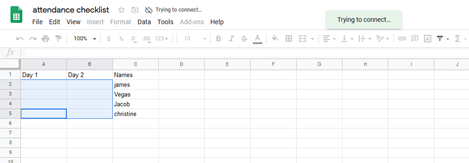
For example, in the making of a class attendance sheet, one may decide to insert the checkboxes on the left-most part of the page and the corresponding names on the right side, as shown below.

Step 4
After writing all the information required in making the checklist and the spaces for inserting the checkboxes are left behind, now you can proceed and highlight the columns and rows that you want to insert your checkboxes. We only highlight the spaces to be inserted checkboxes and not all the data contained in the sheet as it is in the making of some of the google sheets.
Step 5
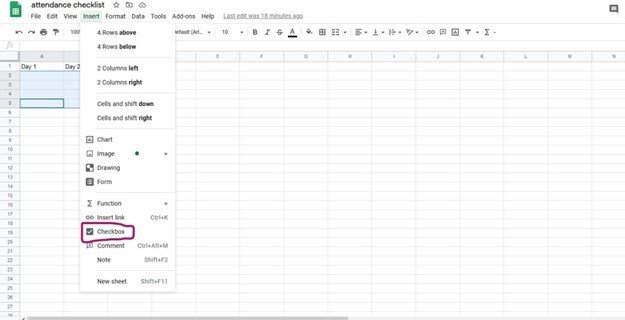
After highlighting the empty spaces on which checkboxes will be inserted, then click on the “insert” tab, which is at the top of the page. Then click “checkbox,” which is still under the insert set. This should be done after highlighting the cell you wish to convert to checkboxes.
Step 4
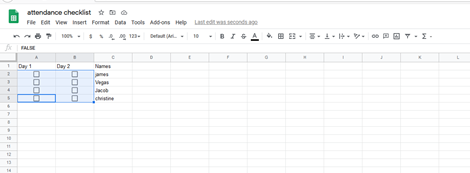
Click “checkbox” to convert the empty cells to a small and simple checkbox that is used in the verification process of the list. The automatically converted boxes are more presentable as compared to hand-drawn boxes as they have uniform alignment and are of the same shape and size. Therefore, this makes Google docs more preferable in making checklists. Due to its automatic property, also it helps to save time that could be rather consumed in making of these small boxes.
Step 5
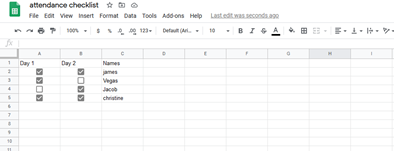
This is the main step and purpose of the Google doc checklist. It involves checking or the verification of the list by ticking on the small boxes drawn on the screen. The ticks are made by clicking on the inside of the box. Similarly, the tick can be withdrawn by clicking inside the box that contains the tick. The ticks also make the sheet presentable as they are of the same shape and size.
The Google user is able to make tick and leave some boxes blank according to his data. Also, the ability of Google sheet to withdraw ticks may help in minimizing the errors involved in the making of the checklist.
The student’s attendance checklist may appear as shown below.
Step 6
This is the last and optional step in making checklists using Google docs. This step is aimed at making the document more presentable. It is achieved by customizing and inserting images on the checklist list created. It is optional as the checklist can work successfully without this step. The “insert” tab and “format” tab are mainly used in this procedure. For example, in the above checklist, the image of each student can be inserted next to the name on the same row. Similarly, the font and size of letters can be changed. Google docs have a variety of fonts, and the user, therefore, benefits as he has the ability to choose the font that fits his task best.
The presence of these customizing settings in the Google doc makes its output to be of high quality and more presentable as it is less prone to errors involved in other ways of making a checklist.

The checklist can further be saved, printed, and can be used for future references.
In conclusion, Google doc software plays a vital role in the making of checklists and involves a simple and short procedure that can be easily understood by a new Google docs user. It is, therefore, more preferable due to the numerous benefits associated with it.


