A Venn diagram is an illustration that uses circles to show the relationships among things or finite groups of things. Circles that overlap have a commonality, while circles that do not overlap do not share those traits. A Google doc is an important tool in making Venn diagrams. The resulting Venn diagram created using Google docs is of high quality and allows users to clearly structure Venn’s information, develop topics easily for perception and visualize complex or monotonous questions.
A Google doc does not have templates for constructing a Venn diagram, and therefore there are two methods that can be used in creating Venn diagrams in the Google docs. These include; use of lucidchart to add a Venn diagram and using Google docs drawing to come up with a Venn diagram. These two methods are clearly discussed below.
Method 1: use of lucidchart to add Venn diagrams on the Google docs
Lucidchart add-on for Google docs contains different diagrams, including the Venn diagram. It can, therefore, be a vital tool in the making of Venn diagrams. However, it is not initially present the Google docs, and therefore the user has to install it before using it. The steps involved in this method are clearly discussed below.
Step 1
Open Google docs using any suitable browser. Click on the large rainbow “+” sign so as to create a new document. Before using this type of method, you need to install the free lucidchart add-on on your Google docs so as to be able to use it successfully. After opening the Google docs software, empty cells and tabs on the upper part of the page are displayed. Click on the “add-ons” tab so as to be able to install the lucidchart on your Google docs.

After clicking the “add-ons” tab, then click the “get-add on” that appears on the “add-ons” setting.
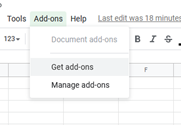
Wait for the new page to open and then search and select the lucidchart. Complete the installation by allowing the free lucidchart diagram to access your Google docs, and therefore you can go on and use it to construct Venn diagrams.

Step 2
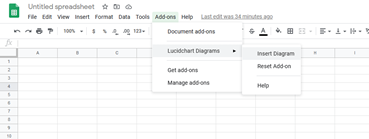
After installing lucidchart on your Google docs, go back to your Google doc page and then click the “add-ons” tab. This time you will notice the lucidchart diagrams will appear in the setting of the add-on. Click on it and then choose “insert the image.”
Step 3
After clicking the “insert diagram” setting, a side-bar appears on the rightmost side of the page. If the user has never used Google docs to create a Venn diagram, then he should click on the “+” sign that is still in the side-bar to add the Venn template. If the user has the Venn diagram template, he should click on the “my diagrams” to insert the already downloaded Venn diagram template.
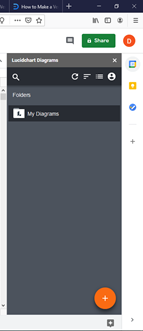
For the user who has never used the Venn diagram template before, after clicking on the “+” sign, then search for the Venn diagram template then download it. After downloading, the template is automatically saved in the “my diagrams” library. It can be accessed by going back on your Google doc page and click on “my diagrams,” which is still on the right side-bar. Then select Venn diagrams and insert them. You can also edit the template before inserting it.
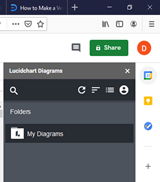
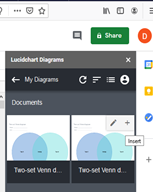
After clicking the “+” sign (insert), the diagram automatically inserts itself in the Google docs page.
Step 4
This step involves editing the Venn diagram displayed on the page and adding the right details, and naming it thereafter; you can save it and use it for further uses.
Customizing settings can also be used to make the diagram more presentable.
Method 2: using Google docs to draw Venn diagrams.
This another method that can be used to make Venn diagrams using Google docs. It involves inserting circles to come up with a Venn diagram. It is a faster and easy way of drawing Venn Diagrams as it does not involve the complicated procedure involved in installing lucidchart diagrams that are alternatively used in making Venn diagrams. However, it may not be presentable as the Venn diagram created using lucidchart diagram because it lacks the automatic property. And therefore wastes a lot of time in constructing the diagrams.
Below are the steps involved in making of Venn diagram using this method and their explanations.
Step 1
Open the Google doc software using a suitable web browser. Click on the rainbow “+” sign to create a new sheet where you will draw your Venn diagram. The sheet has empty cells and top tabs that are used in creating a document using Google sheet. Click the “insert” tab that appears on the top part of the page after opening the Google sheet.

Step 2
After clicking the “insert” tab, a series of settings appears. Then click on the “drawing” setting and wait for it to open so as you can access shapes that are to be used in making this Venn diagram. This is the setting needed in this step to be able to access shapes that are used in making the diagrams.

Step 3
After the drawing page opens, click on the shape which appears on the top of the top tabs of the drawing page. Then select the circle shape. Customize it to the size that fits best, and then click on the “shape” tab to add another similar shape that is combined with the previous shape. The process continues until the required Venn diagram is extracted.
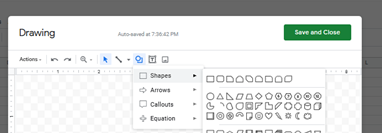
After two circle shapes are combined, they result in a Venn diagram. Below is an example of two circles Venn diagram.

Step 4
This involves editing the diagrams created and adding the relevant text to it. After designing your Venn diagram, you can proceed and save it by clicking on the “save and close” tab that is on the right-top side of the drawing page. After saving, it is automatically transferred to the Google sheet. You can further edit the diagram and save it. The Venn diagram can be customized using the customizing setting to make it more presentable and appealing.
Using any of the above methods, one can comfortably create a Venn diagram without experiencing any challenge.

