
Columns in any document help group and separate your work into different sections and categories. Google Docs provides its users with the ability to add columns to their documents. You can easily add 1, 2, or 3 columns in your Google Doc document. Other word processors provide an easier way to add columns into a document. You can easily press a given button in Word documents to insert columns into your work. With Google Docs, it is not as simple as that, and you have to workaround it.
How to add columns using the Format option
1. Open your Google Doc document.
2. Highlight the text you want to put into columns.
3. From the menu bar, select the Format option.
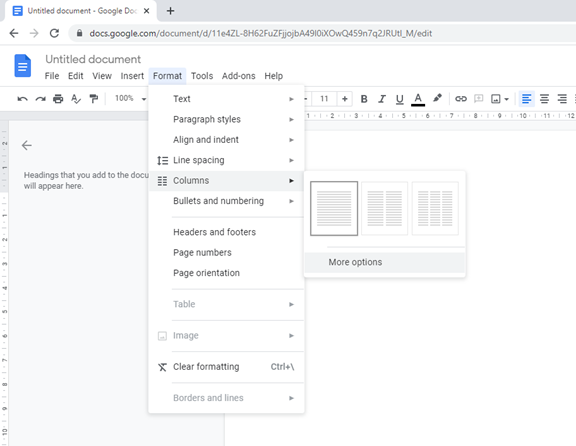
4. Hover your cursor over the Columns feature, then click the columns icon.
5. Select the number of columns you want. As soon as you do this, the text you highlighted will be split into columns.
Note;
- Select the number of column layouts you prefer. Google Doc will select one column by default. It can either be two or three columns.
- There is a ‘More options’ feature in Google Docs. It gives users more control over spacing and lines between the columns.
- To navigate between columns or start typing in the next column, you will need to use the Column break feature. To do this, head to the main menu and click on Insert > Break > Column break. Google Docs will automatically start a new column wherever your cursor insertion point will be placed.
- When it comes to formatting the columns, select the columns you want to change. Click on the Format option > Columns > More options. Afterward, make your preferred changes and click the Apply button.
Adding a column to your Google Docs document using the Tables feature
Using the table tool is a preferable way to add more columns into your Google Doc document. Tabular columns give a user more options when it comes to controlling the appearance of the column. To add columns using tables here is what to do;
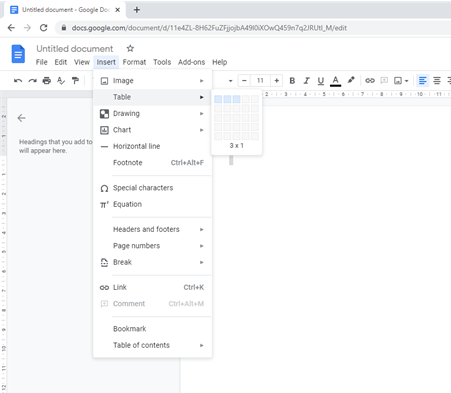
1. On the menu bar, click on Insert.
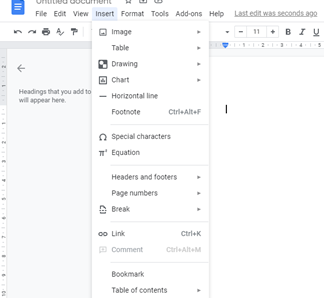
2. Hover your cursor on the Table option to choose the number of columns you prefer.
3. Once you choose the number of columns, click on them.
4. Type in or copy & paste the content you want in columns.
5. To take out the table outline and remain with only columns, right-click anywhere within the table.
6. Select Table properties to open a dialog box.
7. In the dialog box, under the Table border section, click on the 1pt dropdown and select 0 pt.
8. Once you are done, click on the button “OK.”
9. It will remove the borders around the table leaving only columns
How to add columns in the Google Docs Android app
1. On your android phone, open the Google Docs app.
2. Tap on the + button.
3. Click on the Insert option, tap on the table and mention the columns and rows you want to be added.
4. Click on the Insert table button to insert the table.
5. Paste your needed text in the columns formed
Conclusion
You can now add multiple columns and format them easily in your Google Docs document. By simply following the steps mentioned, you can hack this.